# Setting up Pi-hole to Block Ads on Your Local Network
{% hint style="danger" %} Disclaimer — Educational Use Only and Liability LimitsThe procedures and information described in this article are provided for**educational and personal research purposes only**.They are intended to help readers understand, configure, and manage network-level ad blocking using Pi-hole in a controlled, private environment. Be aware that improper configuration of DNS or DHCP settings can lead to network instability, connection issues, or service disruption.\ I do not accept responsibility for any direct or indirect damage, data loss, connectivity problems, security incidents, or legal issues that may arise from following or misapplying the information contained in this guide.
{% endhint %}
Pi-hole is an open-source, free program that functions as a DNS sinkhole and is intended to block tracking domains and ads at the network level. It stops unwanted content from loading on any device linked to your network by intercepting DNS requests.
Filtering Domain Name System (DNS) queries is how Pi-hole works. The Pi-hole receives a request for a domain's IP address from a device on your network. Pi-hole blocks the connection by refusing to resolve a domain that is on a blocklist.
\
To put it simply, Pi-hole filters unwanted traffic before it reaches your browser, serving as a middleman between your devices and the Internet. This method enhances network performance and browsing speed in addition to privacy.
**Prerequisites and Hardware**
To deploy Pi-hole, you will need:
* A **Raspberry Pi** with at least 512MB RAM
* A **microSD card** with an operating system installed. While Pi-hole itself requires little storage, the **read and write speed of the card significantly affects overall performance**.
* According to the [official Raspberry Pi documentation](https://www.raspberrypi.com/documentation/computers/getting-started.html#recommended-sd-cards), it’s recommended to use **at least 16 GB** for **Raspberry Pi OS Lite**, and **32 GB** for versions with a **GUI**.
* Network connectivity (Ethernet or Wi-Fi).
* The ability to **access and modify your router's settings**.
* *A basic understanding of how DNS and DHCP work, since Pi-hole will manage part of your network traffic.*
**Initial Setup of the Raspberry Pi**
We will start by installing the Raspberry Pi Imager tool.
After installing it, we need to:
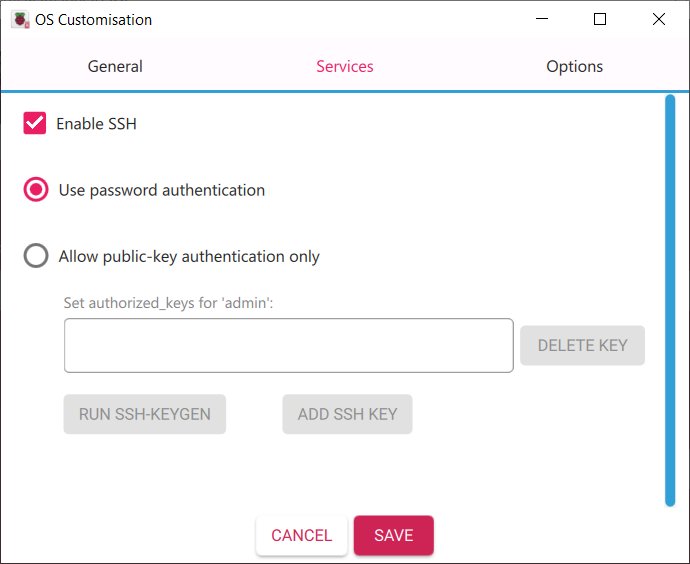
1. Select the operating system for our Raspberry model. After selecting the operating system and SD card, we need to set up:
* Set a hostname (e.g., `pihole`).
* **Enable SSH** for remote administration.
* Configure Wi-Fi credentials (if not using Ethernet).
* Set a username and password.
After that, wait for it to finish. In my case, I used a Raspberry Pi Zero . To find the Raspberry, I scan my local network to see what is assigned to the Raspberry.
**`Tip`**`: You can use tools like nmap, Fing, or Advanced IP Scanner to quickly identify devices connected to your LAN.`
Now we need to connect via SSH. To connect via SSH, we can use the prompt, if installed, or we can use PuTTY.
Once connected via SSH, we can start installing Pi-hole, which we will use as an ad blocker. We can consult the official [Pi-hole documentation](https://github.com/pi-hole/pi-hole) for details.
But before starting the installation, update your Raspberry Pi:
In our case, we have 21 repositories to update. After updating them, we can begin installing Pi-Hole.
**Installing Pi-hole**
There are two ways to install it:
1. An automated command
2. A manual process (explained in the documentation)
In my case, I will use the automatic command, so I run the command, but:
As you can see, it requires root privileges, so we need to switch users to root using `sudo -i`.
Now it asks us to set a static IP. I will use the same one assigned by the router's DHCP, which is 192.168.1.9, and I will set a reservation on my router. But if you prefer, you can change the DHCP pool on the router and then select an IP from those you exclude from the DHCP. Do as you prefer.
Next, we are asked to select a DNS provider. In my case, I can select CloudFare, but feel free to set whichever one you prefer. Now we are asked to accept whether we want to use the default host list used to block advertisements. I select Yes, but as always, do whatever you prefer.
After that page, we are asked if we want to enable log recording. In my case, I select yes because I want to see which sites are blocked.
Next, I run a `sudo reboot` command to restart the pi-hole, and after a `pihole -g` command, I synchronize the list on the pihole.
**The “gravity” command downloads all blocklists and updates Pi-hole’s internal database.**
**Adding More Blocklists**
As you can see, the default block lists are installed. Now we can choose to install other block or access lists, we can create different groups with different privileges, and if we are more familiar with it, we can add Regex filters or block an entire domain from the Domains page.
Now that we have installed Pi-Hole, we can start configuring it, and we will begin by installing another list. I used the lists in this GitHub repository (), but as I have always said, feel free to use whichever you prefer.
As we can see on GitHub, there are several versions available.
I used the Pro version. And select AdBlock for Pi-Hole.
After selecting the list we want to use, we need to go to Pi-Hole and add the list.
As you can see, we add the list but do not download it. To download it, we must run the command sudo `pihole -g` and, once done, we will see that the list has been downloaded. After the command, we will see a window like this:
**`Tip`**`:``It’s good practice to occasionally refresh the lists to keep your protection up to date.`
**Network Configuration**
Now, before we dive into the configuration, we can set the Pi-Hole's IP as the **primary DNS** on the router so that all traffic passes through the Pi-Hole.
If you can't change the DNS, you can disable DHCP on the router and enable DHCP on the Pi-Hole.
And if you can't disable DHCP either, I'm sorry, but the only option is to manually configure the DNS on only some devices, also assigning them a static address to pass traffic through the Pi-Hole. This scenario is the same as mine, since the modem is private and provided by the ISP and not freely purchased by me.
**Advanced Settings**
Now that we have explained how to install and configure Pi-Hole, we can move on to the slightly more complicated part.
Go to **Settings** and on the right-hand side you will see the basic settings. Click on them and switch to Expert.
You will now see other windows such as DHCP Metrics, Cache, DHCP Response, and you can also disable query logging and clear the ARP table.
Now if we go to the screen below, so **DNS**, we can see that we can change the DNS provider to use more than one (not recommended), we can also set the interface settings or propagate the settings on the selected port, but before making any changes you need to be sure of what you are doing.
We can also change the speed limit, which is the number of requests that the pi-hole receives in a given period of time; by default, the maximum limit is 1000 queries in 60 seconds.
But the most important point I wanted to highlight is **Conditional Forwarding**, so what is it used for and why is it important? Because, as you can see in the Clients section, we would have clients passing through the Pi-Hole, but we would not see the host names, rather the IP addresses or even the MAC addresses, because the Pi-Hole does not perform name resolution. So, to configure it, you need to enter true as the first variable, then the subnet mask in my case (192.168.1.0/24) and then the modem address in my case (192.168.1.1). There is also another optional parameter to add, which is the domain name. In the case of a LAN and a fritz.box modem, you would enter fritz.box.
The DNS screen features the **DHCP** section, you can define:
* DHCP lease and lease time
* Exclusions for specific IP ranges
Under **Web Interface - API Settings**, you can:
* Enable 2FA for extra security
* Set a custom admin password
* Change the web interface theme (light/dark)
There are a few other configuration tabs, but these relate to optional settings that you can view on your own.\
For example, you can integrate Pi-hole with Unbound or DNSCrypt for encrypted DNS queries, further improving privacy.\
You may also install a lightweight monitoring tool like Grafana or Netdata to visualize DNS traffic and performance over time.